Introduction to Makers Accounts |
| Click here if you haven't made activities yet | Click here if you have made activities |
What is it? |
| The makers account is a special functionality for subscribers of MrNussbum.com that allows for the creation, deployment, and scoring of interactive activities. It is only available to subscribers. |
What can be created? |
| Digital board games |
| Digital game shows (Jeopardy, Tic Tac Dough) |
| Specific problem sets for the Great American math programs |
| Specific problem sets for Drag and Drop Math |
| Timeline Games |
| Sentence Surgeons |
| Containers (classification activities) |
| Digital Word Searches |
| Correct-me passages |
| Cloze reading exercises |
| Reading Comprehension exercises and question sets |
| Map Quizzes |
What do I do to start? |
| 1.) First, set up a basic account by clicking on the makers icon. Click teacher makers, and then click to set up your makers account. Click "create exercise" and then either register or login. PLEASE NOTE: While only subscribers can use the account, it is a separate account and requires its own username and password. |
| 2.) Add students by entering their initials and clicking "add student." Repeat as necessary. No saving needed. When all students are entered click "print student codes." Cut out the strips and distribute to students. This code is the only bit of information students need to access all of the activities you create and all of the tournaments you make. Have them store securely. |
| 3.) Once your students are added and codes distributed, your account is complete. You'll need to begin making and deploying activities. Video instructions for the creation and deployment of every activity type are available by clicking on "instructional videos" within the menu in the upper right corner when logged in to MrNussbaum, or, from within the individual creation page for each activity type within the makers account. |
Inside the Makers Account |
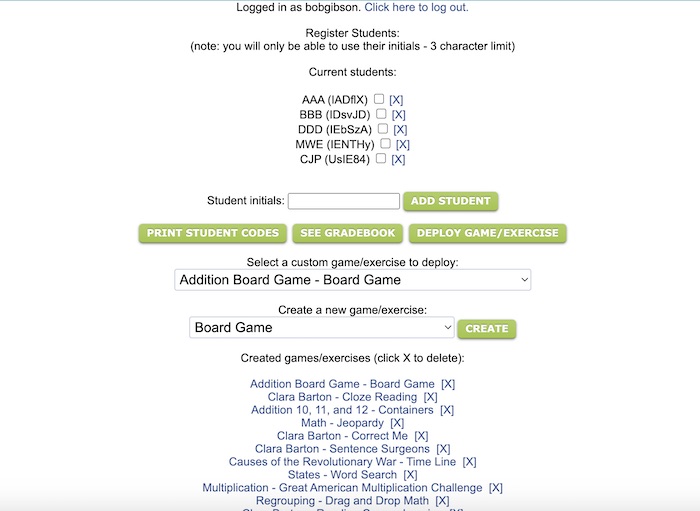
Click on the parts of the image below to learn about each area of your makers account
|
Current Students |
This is a list of the students you have already registered. Each to next student is a unique code that is automatically generated. It needs to be distributed to the student. You can only use three initials to identify each student. Click the X to delete a student |
Add Student |
Here is where you add new students. Simply type the initials and click "add student." No need to save. There are no limits to the number of students you can add. Just make sure each has their code. In the event a student loses their code, they will always be available to you from within your makers account. Students cannot retrieve their own codes. |
Print Student Codes |
Click this button to print a class list of student codes. These can be cut into strips and distributed to students. This roster is updated when you add students. Students need their code to access the activities you make for them. |
See Gradebook |
After students complete the activities you create for them, many will send scores or completion notices to the gradebook. The gradebook only records basic information such as whether the activity has been completed, the number of times the activity has been completed, raw score for the last completion, and average overall score. Some activities do not send scores or notices. Scores can be sorted by activity or student. |
Deploy Game/Exercise |
Click this button AFTER you have: 1.) Selected your custom-made activity for deployment AND 2.) You have selected the students you wish to deploy the activity to. Back to image |
Select a Custom Game/Activity to Deploy |
Once you have created and saved an activity, you will be redirected to the makers page (this page) and the activity you created will appear in this menu. Simply select it, select the students you wish to deploy to, and click the Deploy Game/Exercise Button. Back to image |
Create a New Game/Activity |
When you log into your makers account, click on this menu and select an activity type to create, then click the "create" button. When you select an activity to make, you'll be taken to the specific page to create and save the selected activity. This is one of the first step in the activity making process. The steps are outlined below.
|
Created Games/Exercises |
Here is a list of all activities that you have created. You cannot access them here, but you can delete them from your custom activity list, and from your students' accounts by clicking the "x" next to the activity to delete. |